Raspberry Pi透明人間プロジェクト
「Raspberry Pi定点カメラプロジェクト」をちょっと改変すると「写っている人間を消せるかも?」と思ったので実験したところ、消すことができました!!
もしかして大発明??
どうだろう?処理に結構時間かかるから。。
なんとかしろ!
人間削除(=背景抽出)アルゴリズム
実はめっちゃシンプルです。定点カメラで取った写真を重ねていくと「固定物」はどの写真にもずっと写ってるけど、「動くもの」は写ってる時と写ってない時があります。
なので全部の写真で一番長く写っている色をピクセル毎に抽出していくと「固定物」だけが残るはず。ということです。
実験
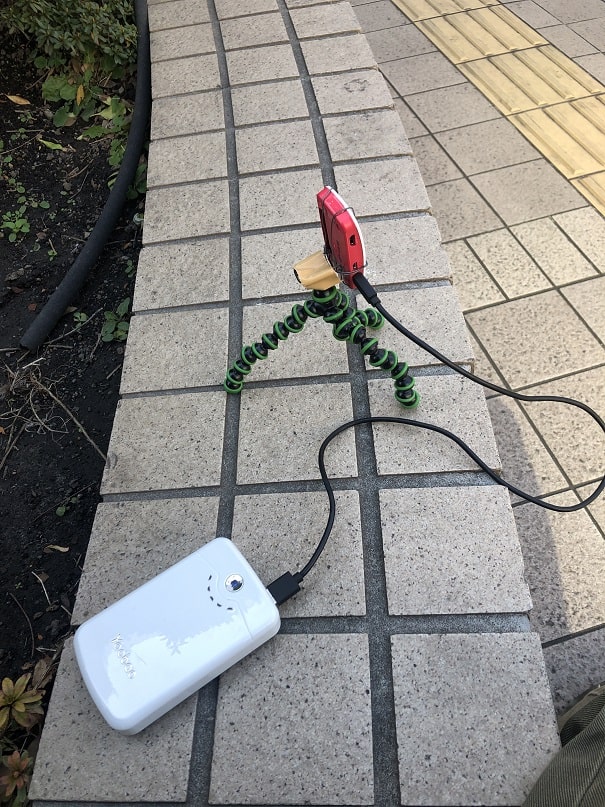
Step1: Raspberry pi(ラズパイ)のpicameraでrgb撮影
picameraにはRGBモードでの撮影機能があります。
このモードで撮影すると、RGBRGBRGB….と各色1byteで書き込まれたファイルができあがります。
jpeg等を使うと圧縮やディザなどされちゃう可能性があり、ピクセルの色比較でうまくマッチングできない可能性があるのでRGB撮影が最適だと思います。
スクリプトはこんな感じです。
# take_invisible.py: invisible man project
from picamera import PiCamera
from pathlib import Path
from time import sleep

def take_photos(howmany=None):
    p = Path('/home/pi/photos/')
    if p.exists()!=True:
        p.mkdir()
    with PiCamera() as camera:
#        camera.resolution = (640 ,368) #解像度下げると後処理は速くなる
        camera.resolution = (1280 ,720)
        for i, filename in enumerate(camera.capture_continuous(str(p/'{timestamp:%Y%m%d%H%M%S}.rgb'),'rgb')): # RGBモードでとる設定
            print('Captured %s' % filename, flush=True)
            if((howmany is not None) and (howmany == i)):
                break
            sleep(1) #適当

if __name__ == "__main__": # スクリプトとして実行された場合
  import sys
  if len(sys.argv)<2:
      print("python3 take_invisible.py <howmany>", flush=True)
      exit()
  sys.argv.pop(0)
take_photos(*list(map(eval,sys.argv)))例:
python3 take_invisible.py 1010 - 20枚くらいが適当かと思います。
Step2: ラズパイで撮った写真ファイルの処理
本来なら、RGBの配列を作って、ベクトルでクラスタリング(k-meansとか)して最大クラスタの重心色を使うとかするべきなのですが、やってみたところ「遅い&枚数少なすぎ」で使い物になりませんでした。。
そこで、今回は「RGBの3byte」が一致するものをカウントして、最大カウントとなった色を使うという簡単な方法を使っています。
この方法の最大の欠点は「色同士の近さを考慮しない」ところとなります。
つまり、r255-g255-b255とr255-g255-b254は"1"しか違わない(人の目にはわからない)のに別物としてカウントしてしまいます。
実際、rgb 24ビットでそのまま「色一致カウント」をするとほとんど色が一致しなくなってしまいました。
そこで、色数を減らす処理r8g8b8(24bit)→r5g6b5(16bit)を入れたらようやくまともに動作しました。
以下のスクリプトは一気にnumpyに読み込んで、1枚統計、2枚統計….n枚統計と順番に処理して、最後に動画化しています。
背景の最終画像だけが欲しい場合は適当に変更してください。
# -*- coding: utf-8 -*-
from pathlib import Path
import struct
import numpy as np
import collections
import subprocess

class RGBFiles:
    """ RGB Files laded in memory as np """
    __slots__ = ['__resolution', '__file_path', '__collection']
    def __init__(self):
        self.__resolution = "1280x720"
        self.__file_path = Path('/<path to data>')
        self.__collection = np.empty((0,1280*720))
        self.__load_files()

    def __load_files(self):
        for f in sorted(self.__file_path.glob("*.rgb"), key=lambda path: int(path.stem)):
            print(f.name)
            with open(f,'rb') as fi:
                tmp=[]
                while True:
                    tmp_bytes = fi.read(3)
                    if len(tmp_bytes)== 0:
                        fi.close()
                        break
                    tmp.append(self.__reduced_binary(tmp_bytes).hex()) #hex文字列にする
                self.__collection = np.append(self.__collection,np.array([tmp]),axis=0)
                print(self.__collection.shape) #どれだけ読み込んだか表示する用

    def __reduced_binary(self,three_bytes): #減色処理
        tmp = list(struct.unpack('<3B',three_bytes))
        tmp[0] = (tmp[0] & 0xf8) | (tmp[0] >> 5) #R
        tmp[1] = (tmp[1] & 0xfc) | (tmp[1] >> 6) #G
        tmp[2] = (tmp[2] & 0xf8) | (tmp[2] >> 5) #B
        return struct.pack('<3B',*tmp)

    def getdata(self, end, start=0):  #画像複数枚のスライスを取る
        print(self.__collection[start:end,:].shape)
        return self.__collection[start:end,:]
    def getresolution(self):
        return self.__resolution
    def getpath(self):
        return self.__file_path
    def getnumfiles(self):
        return self.__collection.shape[0]
    resolution = property(getresolution)
    path = property(getpath)
    numfiles = property(getnumfiles)

def calc_mode(rgbfiles):
    count = 0
    for i in range(1,rgbfiles.numfiles): # 0+1, 0+1+2, 0+1+2+3...と順に処理
        result=[]
        collection = rgbfiles.getdata(i)
        for col in range(collection.shape[1]):
            result.append(collections.Counter(collection[:,col]).most_common()[0][0]) # 最大カウントの色を選択
        result_path = rgbfiles.path/'result'
        write_results(str(result_path) + '/' +format(count,'03') +'.rgb',result) # 後でffmpegで処理しやすいように連番で一旦保存
        count = count + 1
    convertfiles(str(result_path),rgbfiles.resolution) ## rgbファイル→png→mp4

def write_results(filename,result):
    if Path(filename).parent.exists()!=True:
            Path(filename).parent.mkdir()
    with open(filename,'wb') as result_file:
        for b in result:
            result_file.write(bytes.fromhex(b)) #hexから数字に戻す

def convertfiles(result_path, resolution): ## rgbファイル→png→mp4
    for f in Path(result_path).glob("*.rgb"):
        subprocess.run( ['convert', '-size', resolution, '-depth', '8', '{}.rgb'.format(str(f.stem)), '{}.png'.format(str(f.stem))], cwd=result_path)
    subprocess.run( ['ffmpeg', '-f', 'image2', '-r', '10', '-i', '%3d.png', '-r:v', '10', '-crf', '18', '-an', '-s:v', resolution, '-pix_fmt', 'yuv420p', '-vcodec', 'libx264', 'invisible.mp4',cwd=result_path)

if __name__ == "__main__": # スクリプトとして実行された場合
    my_files = RGBFiles()
    calc_mode(my_files)
結果!
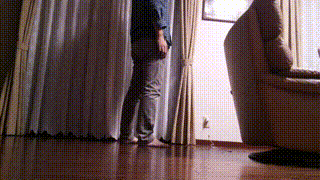
この記事のトップ画像が結果です。
誰?このもっさりした人
とある駅前で定点カメラ持っていって試しました!!
駅前で撮影
完全に怪しい人だったと思います。。
おまわりさーん!
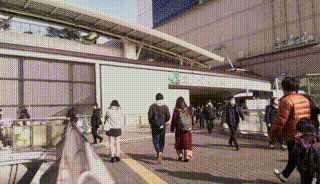
駅前の人が消える!

マイナスは入れられないの?